Achieving a perfectly carbonated and stable homebrew is the culmination of weeks of dedication, with the bottling process representing a critical final frontier. Indeed, errors during this stage can lead to myriad issues, ranging from flat beer and rapid spoilage to the potentially hazardous phenomenon of “bottle bombs.” Home brewers frequently find that the successful transfer of fermented liquid into bottles, ensuring its integrity and desired effervescence, is paramount to enjoyment. The precise steps involved in this process, as detailed in the accompanying video, are foundational for securing a high-quality product. This guide expands upon those insights, providing a more in-depth exploration of the techniques and rationale behind mastering the art of bottling beer and cider.
Essential Preparations for Effective Beer Bottling
Before any liquid is transferred, the proper collection and preparation of equipment are indispensable. The materials chosen directly impact the safety, quality, and longevity of the bottled product. Careful consideration of each component ensures a smooth and sanitary operation.
Selecting the Right Bottles and Closures
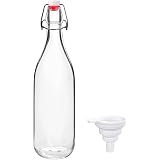
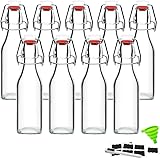
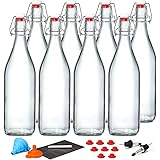
The choice of bottles is not merely an aesthetic one; it is a critical safety and quality consideration. While the video references standard 12 oz or 22 oz bottles, their provenance and type are equally important. It is imperative that only pry-off bottles are utilized, as screw-top bottles are not designed to withstand the internal pressures generated by bottle conditioning and often fail to create an adequate seal for long-term storage. Furthermore, brown bottles are generally favored over clear or green bottles due to their superior ability to filter out ultraviolet (UV) light. Exposure to UV light can lead to “lightstruck” flavors, characterized by an unpleasant skunky aroma, caused by the degradation of hop compounds. Whether new or reused, bottles must be meticulously cleaned to remove all residues, followed by thorough sanitization.
Bottle caps, conversely, must always be new. Once a cap has been crimped onto a bottle, its internal liner and physical structure are compromised. Reusing caps would inevitably lead to poor seals, resulting in oxidation and loss of carbonation, thereby undermining the integrity of the bottled beer or cider.
Bottling Equipment: Cappers, Wands, and Vessels
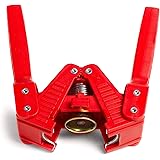
The capping mechanism represents a pivotal tool in the bottling process. Both handheld and benchtop cappers are viable options, with benchtop models often providing more leverage and a consistent crimp, which is particularly beneficial when processing larger batches. The uniform sealing of each bottle is paramount for preventing oxygen ingress and retaining carbon dioxide.
A bottling bucket, or a fermenter specifically adapted for bottling with a spigot, serves as the intermediary vessel for distributing the beer. This setup facilitates a gentle transfer, minimizing splashing and oxidation. Augmenting this, a bottling wand is a critical piece of equipment. This spring-loaded device, which is inserted to the bottom of the bottle before filling commences, prevents splashing by allowing the beer to fill from the bottom up. This design ensures a laminar flow, substantially reducing the liquid’s exposure to oxygen, which is a major contributor to off-flavors such as wet cardboard or sherry-like notes in bottled beer.
Priming Sugars and Sanitizers
Carbonation is typically achieved through the addition of priming sugar, which provides a small amount of fermentable sugar for the residual yeast in the beer to consume within the sealed bottle. This secondary fermentation produces carbon dioxide. While traditional methods involve dissolving corn sugar (dextrose) in hot water and mixing it into the bottling bucket, the video highlights the convenience of carbonation tablets. These tablets offer pre-measured doses, simplifying the process and reducing potential errors in sugar distribution, although precise control over carbonation levels can be slightly more challenging compared to calculated bulk priming methods. Common priming sugars include dextrose, sucrose (table sugar), and dried malt extract (DME), each imparting slightly different flavor profiles and carbonation characteristics.
Sanitizers are fundamental to preventing microbial contamination. Products like Star San, preferred in the video, are acid-based, no-rinse sanitizers that effectively reduce microbial populations on contact. Adherence to the manufacturer’s dilution ratios and contact times is non-negotiable, as improper application can render the sanitizer ineffective or introduce unwanted residues. A properly prepared sanitizer solution, when used consistently, creates a sterile environment that is hostile to spoilage organisms.
The Crucial Precondition: Verifying Fermentation Completion
One of the most critical aspects of successful bottling beer or cider, and indeed, one that carries significant safety implications, is ensuring that primary fermentation has definitively concluded. Bottling prematurely can have severe consequences.
Mitigating the Risk of Bottle Bombs
The term “bottle bomb” refers to a bottle that ruptures due to excessive internal pressure. This occurs when residual yeast continues to ferment fermentable sugars within a sealed bottle beyond the intended carbonation level. The video aptly warns against this hazard, noting that the best-case scenario is a significant mess, while the worst-case involves dangerous glass shards and potential injury. This risk is primarily mitigated by confirming the beer’s final specific gravity (FG).
The specific gravity measurement, typically taken with a hydrometer, quantifies the density of a liquid relative to water. During fermentation, yeast converts sugars into alcohol and carbon dioxide, causing the specific gravity to decrease. A stable specific gravity reading over a period of several days (e.g., 2-3 consecutive readings) indicates that fermentation is complete. The threshold of “near or below 1.010,” as mentioned in the video, is a general guideline often indicative of a well-attenuated beer, though the target FG can vary significantly depending on the beer style, yeast strain, and original gravity. Failure to achieve this stability before bottling introduces substantial risk.
The duration of fermentation, typically stated as two to three weeks, is a general estimate. Factors such as yeast health, pitching rate, fermentation temperature, and wort composition can all influence the timeline. Therefore, relying solely on time or the absence of airlock activity, while useful indicators, is less precise than hydrometer readings.
The Procedure: A Step-by-Step Approach to Bottling
Once all equipment has been assembled and fermentation is verified as complete, the actual bottling process can commence. Each step, from cleaning to storage, plays a vital role in the final product’s quality.
Cleaning and Sanitization Protocols
Cleaning and sanitization are distinct but equally important processes. Cleaning involves the physical removal of visible dirt, debris, and krausen (fermentation residue). For bottles, dishwashers on a high-temperature or sanitize cycle are efficient for cleaning, but any residual food particles or labels must be removed manually beforehand. After cleaning, all equipment that will contact the beer — bottles, caps, bottling wand, tubing, spigot, and bottling bucket — must be sanitized. A soak in a prepared sanitizer solution, ensuring adequate contact time as per manufacturer instructions, is the standard practice. For items like the spigot, a spray bottle filled with sanitizer is often the most practical application method. Eyeballing measurements for sanitizer dilution is strongly discouraged; precise measurement ensures efficacy.
Incorporating Priming Sugar or Tablets
As discussed, priming sugar is essential for bottle conditioning. If using bulk priming sugar (e.g., dextrose dissolved in hot water), it is typically added to the bottling bucket before the beer is transferred. This allows for thorough mixing and an even distribution of sugar throughout the entire batch. When carbonation tablets are employed, they are added directly into each bottle, according to the manufacturer’s directions, and proportional to the desired carbonation level. It is highly advisable to use gloves when handling tablets to prevent the transfer of oils or microorganisms from hands into the sterile bottles.
Precision in Bottle Filling
The act of filling bottles requires careful attention to minimize oxygen exposure. The use of a bottling wand, which fills from the bottom up, is crucial in this regard. As the video highlights, simply pouring beer into the bottle from the top causes splashing and aeration, leading to increased oxidation. Leaving approximately one inch of headspace is recommended; too little headspace can impede proper carbonation or increase pressure, while too much can exacerbate oxidation due to a larger air pocket above the liquid. The goal is to create a small, consistent space for CO2 to collect without excessive oxygen.
Secure Capping Techniques
Once filled, each bottle must be promptly capped. A sanitized bottle cap is placed on the bottle, and a capper is used to firmly crimp it into place. A visual inspection of each capped bottle is advised to ensure that the crimp is uniform and completely sealed around the bottle’s lip. Any imperfections in the seal can lead to carbonation loss and oxidation, compromising the beer’s quality over time. Some brewers opt for oxygen-scavenging caps, which contain a liner designed to absorb residual oxygen in the bottle’s headspace, offering an additional layer of protection against staling.
The Conditioning Period: Storage and Carbonation
After capping, the bottles must be stored at room temperature, typically between 65-75°F (18-24°C), for the secondary fermentation to occur. This “conditioning” phase allows the yeast to metabolize the priming sugar and produce the desired carbonation. The recommendation of at least two weeks is a general guideline; the exact duration can vary based on the yeast strain (some are slower to flocculate and condition), beer style, and ambient temperature. Storing bottles in a cold environment, such as a refrigerator, immediately after bottling will inhibit yeast activity, preventing proper carbonation. After the initial conditioning period, one bottle can be chilled and tested. If the carbonation is insufficient, additional time at room temperature will be necessary. Once adequately carbonated, chilling the bottles not only makes the beer ready to drink but also helps to drop any remaining yeast and proteins out of suspension, leading to a clearer final product.
It is important to note that a small amount of sediment, consisting primarily of dormant yeast, is a natural byproduct of bottle conditioning. While harmless to consume, it is often preferred to leave it behind. Slow and steady pouring of the chilled bottling beer or cider allows the sediment to remain at the bottom of the bottle, ensuring a clear pour into the glass.
Seal the Deal on Your Easy Bottling Questions
Why is bottling homebrew an important step?
Bottling is critical for achieving perfectly carbonated beer and preventing issues like flat beer, spoilage, or dangerous “bottle bombs.” It’s the final stage where your beer gets its fizz.
What kind of bottles should I use for bottling my homebrew?
You should always use pry-off style, brown glass bottles. Pry-off bottles are designed to hold pressure, and brown glass helps protect your beer from light, which can cause unpleasant “skunky” flavors.
What is a “bottle bomb” and how can I prevent one?
A “bottle bomb” is when a bottle ruptures due to excessive pressure from fermentation continuing inside after bottling. To prevent this, always confirm that your beer’s primary fermentation is completely finished before bottling, typically by checking its specific gravity with a hydrometer.
Why do I need to add priming sugar when bottling beer?
Priming sugar provides a small amount of fermentable sugar for the residual yeast in your beer. When sealed in the bottle, the yeast consumes this sugar, producing carbon dioxide that carbonates your beer.
What is the purpose of a bottling wand when filling bottles?
A bottling wand fills bottles from the bottom up, which is crucial for preventing splashing and minimizing the beer’s exposure to oxygen. Reducing oxygen contact helps prevent unwanted off-flavors in your finished beer.