The journey into home brewing often begins with simple, yet profoundly rewarding projects. If you have been captivated by the prospect of crafting your own fizzy, flavorful, and naturally probiotic beverages, then you’re in the right place. The video above provides an excellent visual guide to transforming a humble ginger bug into a delightful batch of homemade ginger beer. This post aims to complement that visual instruction, delving deeper into the nuances of this traditional fermentation process and offering additional insights to help you perfect your brew.
Understanding the Heart of Your Brew: The Ginger Bug
Before diving into the full ginger beer recipe, it is essential to appreciate the role of the ginger bug itself. Much like a sourdough starter acts as the leavening agent for bread, a ginger bug serves as the natural fermentation catalyst for your ginger beer. It is essentially a living culture, a symbiotic colony of wild yeasts and bacteria cultivated from fresh ginger root, sugar, and water.
This active starter is crucial because it introduces the necessary microorganisms to consume the sugars in your ginger beer base. Consequently, these microorganisms produce carbon dioxide gas and a tiny amount of alcohol, resulting in the characteristic fizz and complex flavor profile of fermented ginger beer. Maintaining an active ginger bug is therefore paramount to successful brewing; a healthy bug shows signs of life, typically through consistent bubbling.
Crafting the Flavorful Base for Your Ginger Beer
The foundation of any great ginger beer lies in its base syrup. As demonstrated in the accompanying video, a simple yet effective ratio forms the core of the recipe: 100 grams of fresh ginger and 100 grams of sugar per liter of water. This precise measurement ensures a balanced flavor profile and provides ample food for your ginger bug.
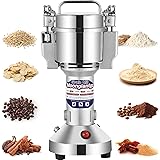
To begin, blend the fresh ginger with a portion of the water until smooth; this extracts maximum ginger flavor. Next, combine this ginger-water mixture with the remaining water and the sugar in a pot. Bringing the mixture to a boil is not only crucial for dissolving the sugar thoroughly but also for creating a clean slate for fermentation by sanitizing the base.
Infusing Depth with Aromatic Spices
While ginger is undeniably the star, incorporating additional spices can elevate your ginger beer to new culinary heights. The video highlights excellent choices such as cinnamon, cayenne, clove, and star anise. Each of these spices contributes a unique dimension to the final product.
Cinnamon offers warmth, clove provides a pungent sweetness, and star anise delivers a distinctive licorice note. Cayenne pepper, though optional, introduces a subtle kick that can beautifully complement the ginger’s natural spice. Furthermore, consider experimenting with other aromatics like cardamom pods, a few black peppercorns, or even a strip of citrus zest for added brightness. Simmering these spices with the ginger base for 10 to 15 minutes allows their flavors to fully infuse into the liquid, creating a wonderfully complex concoction.
The Crucial Cooling and Straining Steps
After the base has simmered and infused, it is imperative to remove it from the heat and allow it to cool completely to room temperature. This step is non-negotiable for several reasons. Firstly, hot liquid would kill the delicate live cultures in your ginger bug, rendering it ineffective for fermentation. Secondly, cooling allows the flavors to meld and deepen further as the liquid settles.
Once cooled, the mixture must be strained. This process removes all the solid ginger pulp and spices, resulting in a smooth, clear ginger beer. Employing a fine-mesh sieve or even cheesecloth will ensure that no unwanted particles remain in your final beverage. Consequently, straining creates a more pleasant drinking experience and prevents sediment from interfering with carbonation.
Initiating Fermentation with Your Ginger Bug
With a perfectly cooled and strained ginger beer base, it is time to introduce your active ginger bug liquid. The amount you add can indeed vary depending on the bug’s activity level, as noted in the video. A more vigorous, bubbly ginger bug might require slightly less, while a less active one could benefit from a more generous addition.
For beginners, it is generally advisable to add a substantial amount of ginger bug liquid. This approach increases the concentration of yeast and beneficial bacteria, thereby giving your ginger beer the best possible chance of initiating a robust fermentation. Subsequently, a strong start leads to more reliable carbonation and a quicker fermentation process, reducing the risk of undesirable microbial growth.
Bottling and Carbonating Your Homemade Ginger Beer
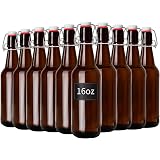
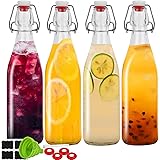
Proper bottling is a critical stage in the ginger beer making process, directly impacting carbonation and safety. It is absolutely essential to use pressure-safe bottles, such as those designed for brewing beer or sparkling cider, as homemade ginger beer can generate significant internal pressure. Never use regular glass bottles, as they are not designed to withstand such forces and can explode, posing a serious safety hazard.
When filling bottles, always leave a small amount of “headroom” at the top—about an inch or two. This space is necessary for the carbon dioxide gas to accumulate. Seal the bottles tightly and allow them to ferment at room temperature for approximately one week. This period allows the yeast to consume residual sugars and produce the desired carbonation. The exact duration can be adjusted based on your preference for fizziness; some may prefer a shorter period for a milder fizz, while others might extend it for a more robust effervescence.
Ensuring Safety and Enjoyment
As the ginger beer ferments, pressure builds inside the bottles. To prevent over-carbonation and potential bottle ruptures, it is advisable to “burp” the bottles daily by briefly opening them to release some gas. Once your desired level of carbonation is achieved, move the bottles to the refrigerator. Chilling the ginger beer slows down the yeast activity significantly, effectively halting fermentation and preserving the carbonation. Furthermore, making the bottles as cold as possible before opening dramatically reduces the chances of excessive foaming or a “ginger beer geyser,” ensuring a more enjoyable pour.
Always exercise caution when handling any fermented beverages under pressure. The combination of an active ginger bug and the right amount of sugar will consistently create a naturally probiotic ginger beer with a delightful effervescence. Therefore, keep your ginger bug healthy and your bottling practices safe to enjoy this refreshing homemade treat.
Bubbling Up Answers: Your Ginger Beer and Ginger Bug Q&A
What is a ginger bug?
A ginger bug is a live starter culture made from fresh ginger, sugar, and water, containing wild yeasts and bacteria. It acts as the natural fermentation catalyst for your ginger beer.
Why is the ginger bug important for making ginger beer?
The ginger bug is crucial because it introduces microorganisms that consume sugars in the ginger beer base. This process produces carbon dioxide gas, which creates the characteristic fizz and complex flavor.
Why is it important to cool the ginger beer base completely before adding the ginger bug?
You must cool the ginger beer base completely to room temperature because hot liquid would kill the delicate live cultures in your ginger bug. If the ginger bug dies, your ginger beer won’t ferment properly.
What kind of bottles should I use for bottling homemade ginger beer?
It is essential to use pressure-safe bottles, such as those designed for brewing beer or sparkling cider. Regular glass bottles are not strong enough to withstand the pressure and can explode.