Reports show the global homebrewing market continues to grow. Millions are discovering the joy of crafting their own beer. Understanding the right homebrewing equipment is key. This article builds on the video above. It dives deeper into essential, optional, and advanced brewing tools.
You can make fantastic beer with basic gear. This guide will help you decide what you truly need. It also covers items that can upgrade your brewing journey. Let’s explore the world of homebrew equipment together.
Essential Homebrewing Equipment: Your Must-Haves
Starting your homebrewing adventure requires a few crucial items. These are the pieces of homebrew equipment you simply cannot skip. They form the foundation of your brewing process. Get these right, and you’re well on your way to great beer.
1. Brew Kettle: The Heart of Your Boil
A brew kettle is vital for heating your wort. It must be large enough for your batch size. Many beginners start with a large kitchen stockpot. This is an affordable and practical option.
You can upgrade to an electric kettle later. These offer precise temperature control. A good brew kettle is essential for mashing and boiling. It’s where the magic begins.
2. Fermenter: Where Beer Comes to Life
Beer truly becomes beer inside a fermenter. This vessel holds your wort during fermentation. Plastic fermenters are a great starting point. They are inexpensive and easy for beginners to use.
Be aware that plastic can scratch over time. Scratches can harbor unwanted microbes. Glass fermenters are another option. They are non-porous and easy to clean.
However, glass can break easily. Handle with extreme care. Stainless steel fermenters are a superior choice. They are durable, easy to sanitize, and conduct heat well.
Stainless steel allows for advanced techniques. These include pressure fermentation and sour beer production. This material is a solid investment for serious brewers.
3. Airlock: Keeping Your Beer Safe
An airlock is a small but mighty piece of gear. It fits into the fermenter lid. It lets CO2 escape during fermentation. This prevents pressure buildup inside the vessel.
Critically, it stops outside air from entering. This protects your beer from contaminants. Fill it with sanitiser solution. This creates a protective barrier.
4. Thermometer: Precision Brewing is Key
Accurate temperature control is crucial. A good thermometer measures mash temperature. Incorrect temperatures can ruin your wort. You might not produce any fermentable sugars.
Simple stick-on thermometers work well. Digital probe thermometers offer more precision. Advanced kettles often have built-in thermometers. Always ensure your mash temperature is correct.
5. Hydrometer: Measure Your Beer’s Progress
A hydrometer is essential for beer quality. It measures specific gravity. This tells you the sugar content of your wort. You’ll measure Original Gravity (OG) before fermentation.
You then measure Final Gravity (FG) after fermentation. These readings help calculate your beer’s alcohol content. They also confirm fermentation is complete. This means your beer is safe to package.
6. No-Rinse Sanitizer: The Golden Rule of Brewing
Sanitisation is arguably the most important step. Without it, your beer will spoil. Anything that touches your wort or beer must be sanitised. This includes equipment, hands, and surfaces.
No-rinse sanitizers are highly convenient. Products like Star San are very popular. They are food-safe and very effective. Always follow the manufacturer’s instructions carefully.
7. Siphon and Tubing: Gentle Transfer
A siphon allows you to transfer beer. You can move it from fermenter to bottling bucket or keg. Tubing connects your siphon to the new vessel. This method minimizes oxygen exposure.
Oxygen can lead to off-flavors in finished beer. A bottling wand attaches to your tubing. It fills bottles from the bottom up. This reduces foaming and oxidation.
8. Bottles, Bottle Capper, and Lids: Packaging Your Brew
You need containers for your finished beer. Glass beer bottles are a popular choice. You can reuse commercial bottles. Make sure they are pry-off style.
A bottle capper seals your bottles. You will also need new bottle caps. Flip-top bottles (Grolsch-style) are another option. They don’t require a capper but need new gaskets eventually.
9. Carbonation Drops or Priming Sugar: For the Fizz
Flat beer is no fun. Your beer needs carbonation. This happens through bottle conditioning. You add a small amount of sugar to each bottle or your bottling bucket.
Yeast consumes this sugar in the bottle. This creates CO2, which dissolves into the beer. Carbonation drops are pre-measured for convenience. Priming sugar requires accurate measurement.
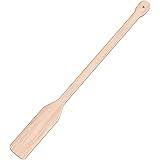
10. Stirring Spoon: Mixing Your Brew
A long stirring spoon is invaluable. It helps mix grains during mashing. It also stirs extracts into your boil kettle. Choose stainless steel over plastic.
Plastic spoons can scratch easily. Scratches can harbor bacteria. Stainless steel is easy to clean. Keep your brewing spoon separate from kitchen utensils. This prevents cross-contamination.
11. Cleaning Solution: Post-Brew Day Clean-Up
Cleaning is separate from sanitizing. You first clean off grime and residue. Then you sanitize. Products like PBW (Powdered Brewery Wash) are excellent.
They effectively remove tough stains and caked-on wort. Cheaper alternatives include sodium percarbonate. Always rinse thoroughly after cleaning. Avoid bleach on stainless steel equipment.
12. Heating Source: Bringing it to a Boil
You need a way to heat large volumes of liquid. A kitchen stovetop works for smaller batches. For larger batches, consider a propane burner. These are powerful and efficient.
Electric brew kettles have built-in heating elements. Ensure your heating source is adequate. It must bring your wort to a rolling boil. It also needs to hold mash temperatures.
Optional Homebrewing Gear: Enhance Your Experience
Once you have the essentials, consider these additions. They can make your brew day smoother. These items are not strictly necessary. However, they can significantly improve your process and results.
1. Bottle Brushes: For Thorough Bottle Cleaning
Many brewers use bottle brushes. They help clean the inside of bottles. Some find them very effective. Others prefer simply rinsing bottles immediately after use.
They can be particularly useful for plastic bottles. The bristles reach into crevices. Ensure bottles are spotless before sanitizing. Clean bottles are crucial for beer quality.
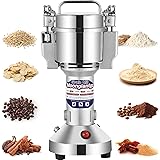
2. Grain Mill: Freshly Milled Malt
Most homebrew shops will mill your grain for you. Buying pre-milled grain is common. A personal grain mill offers more control. You can mill grain fresh before brewing.
Freshly milled grain can yield better flavors. You can also experiment with different crush levels. This allows for fine-tuning your mash efficiency. Uncrushed grain stores longer than crushed.
3. Immersion Wort Chiller: Rapid Cooling
Cooling your wort quickly is important. It prevents off-flavors. It also reduces the risk of infection. An immersion wort chiller speeds up this process.
This coiled tube sits directly in your hot wort. Cold water runs through it. If you lack a chiller, use an ice bath. No-chill containers are another alternative. These seal hot wort to cool overnight.
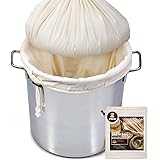
4. Hop Bag or Sieve: Clearer Beer
Hops add flavor and aroma to beer. They can also leave particulate matter. A hop bag contains hops during the boil. This prevents hop debris from entering your fermenter.
A hop sieve provides similar filtration. These tools help produce clearer beer. They also simplify cleanup after brewing. Use them for dry hopping too.
5. Yeast Starter: Boost Your Yeast Health
A yeast starter increases yeast cell count. This ensures a healthier fermentation. It’s not equipment, but a process adjustment. You can buy fewer yeast packets.
A starter helps prevent underpitching. Underpitching can lead to sluggish fermentation. It can also cause off-flavors. While not essential, it significantly improves yeast performance.
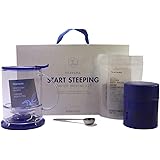
6. Storage Containers and Jars: Organization is Key
Keeping your brewing space organized helps. Storage containers keep ingredients tidy. Mason jars are useful for various tasks. They store brewing salts or finings.
Jars are also perfect for harvesting yeast. You can reuse food-grade jars. Clean them thoroughly first. Proper storage prevents clutter and spoilage.
7. Spray Bottles: Efficient Sanitizing
Spray bottles offer convenience. They apply sanitizer to surfaces quickly. This saves sanitizer solution. You don’t need to fill entire vessels.
They are excellent for sanitizing airlocks. They also work for small tools. Keep one filled with your no-rinse sanitizer. It makes sanitizing faster and easier.
8. Secondary Fermenter or Racking Vessel: For Longer Aging
A secondary fermenter allows bulk aging. You transfer beer off the yeast cake. This prevents off-flavors from prolonged yeast contact. This is important for beers aged over a month.
It also allows for fruit additions or dry hopping. You can prime the entire batch here for consistent carbonation. This eliminates individual bottle priming. It offers greater control over your final product.
9. Bottle Sanitizing Pump: Speed Up Bottling
Bottling can be tedious. A bottle sanitizing pump speeds the process. It quickly sanitizes the inside of each bottle. You just press the bottle onto the pump.
Sanitizer is sprayed upwards. This ensures full coverage. It makes bottling day much more efficient. This saves time and effort.
Advanced Homebrew Tools: Taking Your Brewing to the Next Level
These items are for the truly dedicated brewer. They are often more expensive. They add complexity to your setup. But they unlock advanced brewing techniques and ultimate control.
1. Fermentation Temperature Control: The Single Most Important Upgrade
Controlling fermentation temperature is critical. It dictates yeast health and beer flavor. Off-flavors often stem from poor temperature control. It’s vital for consistent, quality beer.
A dedicated fermentation chamber offers precise control. This can be a modified fridge or freezer. An Inkbird temperature controller manages it. While complex, it transforms your beer quality.
Simple methods exist for beginners. Find a cool, stable spot in your home. Use a water bath to stabilize temperature. But a chamber offers unparalleled control.
2. pH Meter: Optimize Your Mash
Mash pH significantly impacts efficiency. It affects enzyme activity. Correct pH extracts sugars more effectively. This leads to higher gravity beers.
A pH meter measures mash acidity. Adjustments can be made with lactic acid. This fine-tunes your brewing process. It’s a step for those obsessed with efficiency.
3. Pumps: Streamline Liquid Transfer
Pumps move wort between vessels effortlessly. They remove the need for gravity transfers. This saves heavy lifting. They are essential for recirculation in certain systems.
Pumps add cleaning complexity. They are useful for larger setups. They can also aid in rapid chilling with plate chillers. These tools make brew day less physically demanding.
4. Plate Chiller: Ultra-Fast Cooling
A plate chiller is a highly efficient heat exchanger. It cools hot wort rapidly. Wort flows through narrow channels. Cold water flows in opposing channels.
This setup provides very fast cooling. It’s great for high-volume brewers. However, plate chillers are hard to clean. They require careful sanitization routines.
5. Food-Grade Oxygen Tank and Carbonation Stone: Healthy Yeast
Yeast needs oxygen to reproduce initially. This ensures a healthy fermentation. Shaking your fermenter provides some oxygen. An oxygen tank offers precise control.
A carbonation stone diffuses oxygen into wort. This promotes vigorous yeast growth. It leads to a cleaner, more complete fermentation. This is for brewers seeking ultimate yeast health.
6. Kegs and Kegging Equipment: Beer on Tap at Home
Kegging replaces bottling for many brewers. It allows for serving beer on tap. This offers convenience and faster carbonation. It also eliminates the need for bottle cleaning.
Kegging involves a learning curve. You need kegs, a CO2 tank, and a regulator. Tap lines and a faucet are also required. While an investment, it’s incredibly rewarding for homebrewers.
The goal of homebrewing is to have fun. You want to make great beer. Enjoying the fruits of your labor is the reward. Learning more enhances the experience.
Consider reading “How to Brew” by John Palmer. This book is a wealth of information. It covers all aspects of homebrewing. Understanding your homebrewing equipment improves your craft.
Kettle Talk: Your Homebrewing Equipment Q&A
What is the most important step in homebrewing?
Sanitisation is arguably the most important step in homebrewing, as it prevents your beer from spoiling by killing unwanted microbes on your equipment.
What is a brew kettle used for?
A brew kettle is a vital piece of equipment used for heating your wort (unfermented beer) during the brewing process, and many beginners start with a large kitchen stockpot.
Why do I need a fermenter?
A fermenter is the vessel where your wort is held during the fermentation process, which is when it truly becomes beer. Plastic fermenters are a common and inexpensive choice for beginners.
What does an airlock do?
An airlock is a small piece of gear that allows carbon dioxide (CO2) to escape from the fermenter during fermentation while preventing outside air and contaminants from entering the vessel.
What is a hydrometer used for?
A hydrometer is essential for measuring the specific gravity of your wort and beer, which tells you the sugar content and helps calculate the final alcohol percentage.