The allure of store-bought kombucha is undeniable, with its vibrant flavors and reputation as a healthy, effervescent beverage. However, as the accompanying video cleverly illustrates, consistently purchasing these bottled delights can quickly become an expensive habit. Many enthusiasts are discovering the significant benefits of making homemade kombucha, transforming their kitchens into mini-breweries for a fraction of the cost.
Making your own fizzy, fermented tea might seem daunting at first glance, but it is actually one of the most accessible fermentation projects you can undertake. This process not only saves you money but also provides a deep sense of satisfaction from crafting a delicious, probiotic-rich drink from scratch.
Embracing the World of Homemade Kombucha
The journey to brewing your own kombucha begins with understanding its core components. At its heart, kombucha is a fermented tea, a beverage that has been enjoyed for centuries across various cultures for its unique taste and potential health benefits.
The transformation from sweet tea to tangy kombucha is orchestrated by a remarkable organism known as the SCOBY. This acronym stands for Symbiotic Culture of Bacteria and Yeast, a gelatinous disc that resembles a mushroom or, as described in the video, a “funky boogery-looking thing.”
The Vital Role of the SCOBY
Consider the SCOBY as the engine of your fermentation project. This living culture thrives on a mixture of brewed tea and sugar, consuming these ingredients and metabolizing them into a host of beneficial compounds. Consequently, the tea’s sweetness diminishes, giving way to a pleasant tartness and complex flavors.
Acquiring a SCOBY is straightforward; you can easily purchase one online from retailers like Amazon, or even cultivate your own. By adding a bottle of unflavored, raw kombucha to a prepared sweet tea mixture, you provide an ideal environment for a new SCOBY to grow over several weeks. This flexibility makes getting started surprisingly simple.
Brewing Your First Batch: The Primary Fermentation
The initial phase of kombucha creation, often called the first fermentation, is where the magic truly begins. It involves a simple combination of ingredients and a bit of patience, allowing the SCOBY to work its wonders.
First, you brew a robust pot of black tea, which provides the foundational flavor and nutrients for the SCOBY. Black tea is typically recommended for beginners due to its consistent nutrient profile and robust flavor that stands up well to fermentation, although other true teas like green or oolong can also be used after some experience.
Ingredients for Your Basic Brew
Once your tea is brewed, sugar is dissolved into it. This sugar is not for your palate but serves as the primary food source for the SCOBY’s bacteria and yeast. Without adequate sugar, the fermentation process would stall, and your SCOBY would not thrive.
Subsequently, this sweetened tea is cooled to room temperature and transferred to a clean brewing vessel, typically a large glass jar. Introducing your SCOBY to this mixture initiates the fermentation. A small amount of starter liquid from a previous batch or store-bought unflavored kombucha is also crucial, as it lowers the pH and protects the brew from unwanted mold growth.
Monitoring the Fermentation Process
Over the course of one to two weeks, you will observe the kombucha gradually changing. The dark brown color of the sweet tea will lighten considerably, transitioning to a light brown or amber hue. Furthermore, the taste will evolve from overtly sweet to a balanced profile of slight sweetness with a distinct acidic tang, indicating a successful fermentation.
The exact duration depends on factors such as ambient temperature and your personal taste preference. Warmer environments accelerate fermentation, while cooler temperatures slow it down. It is important to taste your kombucha periodically after the first week to determine when it has reached your desired level of tartness.
Elevating Your Kombucha: Second Fermentation and Flavoring
Once the primary fermentation is complete, your kombucha is ready for its next transformation: flavoring and carbonation. This stage, known as the second fermentation, is where you infuse your brew with exciting tastes and achieve that characteristic fizz.
During the primary fermentation, the SCOBY consumes most of the sugar. However, by adding new sugar sources during the second fermentation, you provide additional fuel for the remaining yeast to produce carbon dioxide. This gas, trapped in a sealed bottle, creates the beloved bubbles.
Infusing Flavors and Carbonation
Fruit is often an ideal choice for flavoring homemade kombucha, as the natural sugars within the fruit contribute to the carbonation process. Popular options include berries, sliced ginger, citrus peels, or even pureed fruit. You can also experiment with herbs like mint or rosemary, or spices such as cinnamon or cloves.
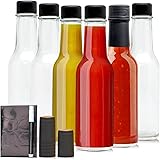
Simply add your chosen flavorings to airtight bottles, then fill them with your finished kombucha, leaving a small amount of headspace. These bottles are then sealed and left at room temperature for another four to five days. During this period, the carbonation builds, resulting in a perfectly fizzy homemade kombucha.
The Unbeatable Value of Brewing Your Own
Beyond the simple joy of creation, the most compelling reason to make homemade kombucha is the profound cost savings. The difference between brewing at home and purchasing from the store is significant, illustrating a remarkable value proposition.
A single bottle of kombucha from a retail store typically costs between $3 and $4. In stark contrast, the ingredients required to produce a batch of homemade kombucha amount to a mere fraction of that price. For example, a single serving can be made for as little as 50 cents.
Breaking Down the Savings
Consider the recurring expenses: black tea leaves or bags are inexpensive, and sugar is a pantry staple. While there’s an initial investment in a SCOBY and brewing vessel, these are one-time costs that quickly pay for themselves after just a few batches. The SCOBY, if properly cared for, can last indefinitely, continuously producing new batches of kombucha.
Furthermore, by choosing to make homemade kombucha, you gain complete control over the quality and type of ingredients. You can opt for organic teas and fruits, ensuring your beverage is free from artificial flavors or excessive sugar content often found in commercial varieties. This direct oversight enhances both the healthfulness and the unique flavor profile of your brew.
Breaking Free from the Bottle: Your Kombucha Q&A
What is kombucha?
Kombucha is a fermented tea beverage that has been enjoyed for centuries. It transforms from sweet tea into a tangy, probiotic-rich drink.
What is a SCOBY?
A SCOBY stands for Symbiotic Culture of Bacteria and Yeast. It is a gelatinous disc that acts as the living culture, or ‘engine,’ for fermenting tea into kombucha.
Why should I make kombucha at home?
Making kombucha at home is significantly cheaper than buying it, costing as little as 50 cents per serving. It also provides satisfaction and allows you to control the ingredients.
What are the main steps in making homemade kombucha?
The process involves primary fermentation, where the SCOBY ferments sweetened tea, followed by a second fermentation where you add flavors and create fizz in sealed bottles.
What basic ingredients are needed to start brewing kombucha?
You will need brewed black tea, sugar (to feed the SCOBY), a SCOBY itself, and some starter liquid from a previous kombucha batch or store-bought unflavored kombucha.