There’s something incredibly satisfying about transforming simple, fresh ingredients into a unique, handcrafted beverage. I remember the first time I ventured into homebrewing; it felt like a mysterious, almost alchemical process. Now, with the abundance of sweet raspberries from the local farmer’s market, the allure of making a delicious batch of homemade raspberry mead is simply irresistible. If you’ve just watched the video above and are feeling inspired to start your own mead-making journey, you’re in the right place. This guide will walk you through the essential steps, expand on the video’s instructions, and help you brew your very first flavorful raspberry mead batch.
Embarking on Your Raspberry Mead Adventure
Making your own mead, often called “honey wine,” is a rewarding hobby. It connects you with ancient traditions and allows for incredible creativity. This particular recipe for raspberry mead combines the natural sweetness of honey with the tart, vibrant flavor of fresh raspberries, creating a truly unique drinking experience.
Before you begin, remember that homebrewing is a journey of patience and precision. However, the basic steps are quite straightforward, as you’ve seen in the video. Let’s delve deeper into what you need and how to ensure a successful start.
The Absolute Necessity: Sanitation for Success
The video briefly touches on sanitizing equipment, but this step cannot be overstressed. Imagine building a beautiful house only for it to be riddled with termites – that’s what happens if your equipment isn’t properly sanitized. Wild yeasts and bacteria are everywhere, and they can easily spoil your mead, leading to off-flavors, mold, or a completely undrinkable batch.
Therefore, every piece of equipment that will come into contact with your mead must be thoroughly cleaned and then sanitized. Cleaning removes visible dirt, while sanitizing eliminates microscopic organisms. Use a good brewing sanitizer like Star San or iodine-based solutions, following the manufacturer’s instructions diligently. A good rule of thumb is, “If it touches your mead, sanitize it!”
Essential Equipment for Making Mead
To make raspberry mead successfully, a few key pieces of equipment are necessary. Think of these as the tools in your culinary workshop, each serving a specific purpose in creating your honey wine.
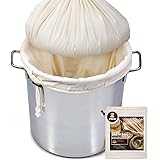
- Fermentation Vessel: This is where your mead will live during fermentation. A 1-gallon glass carboy or a food-grade plastic bucket with an airtight lid are common choices for beginners.
- Airlock and Stopper (Bung): The airlock fits into the stopper, which seals the top of your fermentation vessel. It allows the carbon dioxide (CO2) produced during fermentation to escape, preventing pressure buildup, while also stopping oxygen and unwanted contaminants from getting in.
- Large Stirring Spoon: A long-handled, food-grade spoon is crucial for mixing your ingredients thoroughly.
- Sanitizer: As discussed, essential for preventing spoilage.
- Funnel: Helps in transferring ingredients, especially liquids, into the narrow opening of a carboy without spills.
- Hydrometer (Optional but Recommended): This tool measures the sugar content of your liquid, known as specific gravity. It’s invaluable for calculating the potential alcohol content of your finished raspberry mead and tracking fermentation progress.
Gathering Your Raspberry Mead Ingredients
The beauty of this fruit mead recipe lies in its simplicity and the quality of its components. Each ingredient plays a vital role in the final flavor profile and the success of your fermentation.
Sweet Raspberries: The Heart of Your Mead
The video highlights using fresh raspberries from a farmer’s market, which is an excellent choice for flavor and aroma. When adding berries to your vessel, a clever trick is to freeze them beforehand. Freezing causes the cell walls of the raspberries to break down. This process, upon thawing, allows more of their delicious juice and vibrant flavor to be extracted into your mead, almost like squeezing extra sweetness from a sponge.
While fresh is ideal, frozen raspberries can also be used, ensuring they are fully thawed before adding. This maximizes flavor extraction. You might even consider gently muddling them to further release their essence, being careful not to introduce too much air.
The Golden Nectar: Choosing Your Honey
Honey is the primary fermentable sugar in mead, and its quality significantly impacts the final taste. The video mentions that “the better quality of honey you use, the better your mead will turn out,” which is absolutely true. Think of honey as the canvas for your painting; a richer, more nuanced canvas will lead to a more complex masterpiece.
While any honey will work, different varietals offer distinct flavor profiles. For instance, clover honey is mild and widely available, offering a neutral base that lets the raspberry shine. Wildflower honey provides a more complex, floral bouquet. Orange blossom honey can add a delicate citrus note, complementing the berries beautifully. Explore local beekeepers for unique flavors!
Water: The Unsung Hero
The choice of water might seem minor, but it’s crucial. Using bottled spring water, as suggested in the video, is a safe bet. Tap water often contains chlorine or chloramines, which can inhibit yeast activity or create off-flavors. If you must use tap water, consider boiling it for 15-20 minutes to drive off the chlorine, then let it cool completely before use.
Water forms the bulk of your mead, so ensure it’s clean and free of undesirable chemicals. It’s like the clean glass you drink from; it shouldn’t add any unwanted taste.
Yeast Nutrient and Acid Blend: Fueling Fermentation
These two additions are critical for a healthy and efficient fermentation. They act as a balanced diet for your yeast. Yeast nutrient, often a blend of diammonium phosphate (DAP) and yeast hulls, provides essential nitrogen and other micronutrients that yeast needs to thrive. Honey alone does not provide all the necessary nutrients for yeast, leading to sluggish or “stuck” fermentations and potential off-flavors.
Acid blend helps adjust the pH of your must (unfermented mead). Yeast prefers a slightly acidic environment, and adjusting the pH can prevent bacterial growth and improve the overall flavor profile of your finished homemade raspberry mead. These ingredients ensure your yeast stays happy and productive, much like providing good soil for a plant to grow.
The Magical Microbe: Selecting Your Yeast
Yeast is the single-celled organism responsible for converting sugars into alcohol and carbon dioxide. While “yeast” is a general term, specific strains are better suited for mead. Wine yeasts, such as Lalvin K1V-1116 or EC-1118, are popular choices. They are robust, tolerate higher alcohol levels, and produce clean flavors. K1V-1116, for example, is known for enhancing fruit characteristics, making it perfect for raspberry mead.
Properly hydrating your yeast before pitching (adding it to the must) can also kickstart a healthier fermentation. This usually involves rehydrating the dry yeast in warm water for a short period before adding it to the main batch.
Assembling Your Raspberry Mead: Step-by-Step
Following the video’s guidance, let’s put it all together with a bit more detail to ensure a smooth process.
- Add Raspberries: Start by carefully adding your thawed, or even gently muddled, raspberries to your sanitized fermentation vessel. A wide-mouth funnel can be very helpful here.
- Introduce Honey: Next, pour in your chosen honey. If your honey is very thick, you can gently warm the jar in a warm water bath to make it more pourable. This makes it easier to mix.
- Add Water: Fill your vessel with spring water, leaving a few inches of headspace. This space is crucial to prevent your fermenting mead from bubbling over, especially during the initial vigorous fermentation phase, often called the “krausen” stage.
- Incorporate Acids and Yeast Nutrient: Measure and add the recommended amounts of acid blend and yeast nutrient. These should be dissolved in a small amount of warm water first to ensure even distribution throughout the must.
- Pitch Yeast: Finally, add your rehydrated yeast to the mixture. Gently stir everything together thoroughly. The goal is to distribute the honey, nutrients, and yeast evenly. This gives the yeast immediate access to its food source.
- Seal and Airlock: Securely cap your fermentation vessel with the stopper and airlock. Fill the airlock with a small amount of sanitized water or vodka. This creates a barrier against external contaminants while allowing fermentation gases to escape.
The Magic of Fermentation and Alcohol Content
Once your mead is assembled and sealed, the yeast gets to work. This process will transform the sugars from the honey into alcohol and carbon dioxide. The video mentions that this batch should come out to around 14% alcohol by volume (ABV), and this can be adjusted.
The amount of honey you start with directly impacts the potential alcohol content. More honey means more sugar for the yeast to consume, which typically results in a higher ABV, provided the yeast strain can tolerate it. This is where a hydrometer becomes incredibly useful. By taking an “original gravity” (OG) reading before fermentation and a “final gravity” (FG) reading after, you can accurately calculate your mead’s ABV. It’s a bit like weighing your ingredients at the start and end of a baking project to see how much was used up!
Now, store your fermenting raspberry mead in a cool, dark place with a stable temperature, ideally between 60-75°F (15-24°C). This stable environment allows the yeast to work steadily, preventing stress that could lead to off-flavors. All that’s left now is the exciting wait for Part Two!