Have you ever dreamed of crafting your own delicious beer right in your kitchen? As you’ve seen in the video above, embarking on a home brewing adventure, especially with a classic like an English Brown Ale, is not only achievable but incredibly rewarding. This guide expands on the process demonstrated, offering deeper insights into creating your own fantastic brew using a recipe kit.
Making beer at home is a fantastic hobby, offering both a creative outlet and the satisfaction of tasting your own handiwork. For beginners, a pre-packaged recipe kit simplifies the journey, providing all the essential ingredients and clear instructions. Let’s delve into the details of brewing a rich and malty English Brown Ale, ensuring every step is clear and enjoyable.
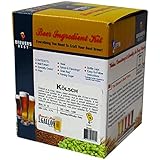
Unboxing Your English Brown Ale Brewing Kit
A good brewing kit, such as the Brewer’s Best English Brown Ale kit featured in the video, is your starting point for a successful batch. These kits are designed to take much of the guesswork out of ingredient selection. They typically include everything you need, from grains to yeast, ensuring a balanced and flavorful final product.
What can you expect to find inside? Most kits contain detailed directions and recipes, which are valuable resources for future brews. You’ll likely discover various specialized ingredients, each playing a crucial role in the distinct character of an English Brown Ale. For instance, the video showcases Willamette hops, known for their mild, floral, and slightly spicy aroma. These contribute a pleasant balance without overpowering the malt.
Key Malt Varieties for Flavor
The malt selection is particularly important for an English Brown Ale. The kit includes several types, such as crushed caramel malt, Munich malt, dark malt, and chocolate barley. Caramel malts provide sweetness, body, and color, often imparting notes of toffee or caramel. Munich malt adds a rich, bready character and deep golden to amber hues.
Dark malt and chocolate barley are crucial for the brown ale’s signature color and complex roasted flavors. Chocolate barley, despite its name, doesn’t taste like chocolate directly but offers notes of coffee, roasted nuts, and a subtle bitterness that balances the sweetness. These malts work together to build the beer’s foundation, contributing to its body, color, and malty complexity. Additionally, liquid malt extract (LME) and amber spray-dried malt (DME) are included, providing the bulk of the fermentable sugars that the yeast will convert into alcohol.
The Steeping Process: Extracting Grain Goodness
Steeping grains is an initial, vital step for many homebrewing kits, especially those using liquid malt extract. This process involves soaking specialty grains in hot water to extract their unique flavors, colors, and aromas. In the video, the brewer meticulously steeps the grains to lay down the flavor groundwork for the English Brown Ale.
Maintaining the correct temperature is paramount during steeping. The goal is to avoid extracting undesirable tannins, which can lead to an astringent taste. For this English Brown Ale, the ideal steeping temperature is around 68 degrees Celsius (155 Fahrenheit), held for approximately 20 to 30 minutes. This precise temperature range ensures that beneficial compounds are extracted without releasing harsh flavors. After steeping, the grains are removed from the wort, taking care not to squeeze the grain bag, as this can also release those unwanted tannins.
Boiling the Wort and Hop Additions
Once the grains have been steeped and removed, the next major step is to bring the wort (unfermented beer) to a boil. This boiling phase serves several critical purposes: sanitizing the wort, concentrating sugars, and, most importantly, adding hops. The video demonstrates preparing the liquid malt extract and adding the first packet of hops as the wort approaches a slow rolling boil.
Hops are added at different stages of the boil to achieve specific characteristics. Hops added early in the boil contribute bitterness, balancing the sweetness from the malt. Those added later, around the 30-minute mark as shown in the video, contribute more to the hop flavor and aroma. For an English Brown Ale, the hop profile is typically subdued, allowing the malt flavors to shine. After the full boil, the total volume is adjusted with filtered water, bringing it up to the 23-liter mark before it’s cooled.
Fermentation: Where the Magic of English Brown Ale Truly Happens
After the boil, the wort must be cooled rapidly to a temperature suitable for yeast. This is a critical step, as pitching yeast into hot wort will kill it, preventing fermentation. Once cooled, the sanitized wort is transferred to a fermenter, such as the Coopers DIY Beer kit fermenter seen in the video. Sanitization is not just recommended; it is absolutely essential at every stage where the wort is exposed after the boil to prevent contamination from wild yeasts or bacteria, which can spoil your batch.
The yeast, a key ingredient from the kit, is then sprinkled into the cooled wort. This process is called “pitching the yeast.” Yeast are living organisms that consume the sugars in the wort and produce alcohol and carbon dioxide as byproducts. For an English Brown Ale, an appropriate ale yeast strain contributes to the beer’s characteristic fruity esters and malty notes. The fermenter is then sealed, and the beer is allowed to ferment for “a couple of weeks,” as mentioned in the video. During this time, the active fermentation transforms the sweet wort into a complex, alcoholic beverage. Patience is key here, as rushing this stage can lead to an unfinished or off-flavored beer.
Priming for Perfect Carbonation in Your Homebrew
Once fermentation is complete, your beer is flat. To achieve that satisfying fizz, a process called “priming” is necessary. This involves adding a small amount of fermentable sugar to the beer just before bottling. As the video explains, while carbonation drops are an option, using priming sugar (often corn sugar) provides more control over the carbonation level.
The standard recommendation for priming sugar is 1 ounce per gallon of beer. For a 6-gallon batch, this translates to 6 ounces of priming sugar. This sugar is mixed with about 1 pint of filtered water and boiled for 7 to 10 minutes to sanitize it. After boiling, it’s allowed to cool slightly before being gently stirred into the fermented beer. It’s crucial not to stir too vigorously, as this can disturb sediment at the bottom of the fermenter. This additional sugar provides a small feast for the remaining yeast in the beer, producing carbon dioxide inside the sealed bottles, which then dissolves into the beer, creating the carbonation.
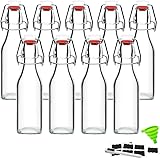
Bottling Your English Brown Ale for Conditioning
With priming sugar added, the beer is now ready for bottling. Thoroughly sanitizing all bottles and equipment is non-negotiable at this stage. Any contamination here can ruin weeks of hard work. As the brewer demonstrates, taking a small sample before bottling can give you a preliminary taste of your English Brown Ale, offering a glimpse into its potential flavor profile. Even if it tastes a bit flat or slightly different from the final product, it’s a good indicator of what’s to come.
After bottling, the beer needs time to condition in the sealed bottles. This conditioning period, typically “a few weeks,” allows the yeast to consume the priming sugar, carbonate the beer, and allows the flavors to mature and meld. Proper conditioning is what transforms a good homebrew into a great one, developing its full character and carbonation. The anticipation during these weeks is part of the fun, culminating in the joy of finally tasting your own perfectly carbonated, flavorful English Brown Ale.