Crafting the Perfect NEIPA Grain Bill for Haze and Body
When setting out to brew a New England IPA, the foundation of its unique character begins with your grain bill. As mentioned in the video, your grain selection is paramount for developing both the desirable hazy appearance and the luscious, full mouthfeel that defines the style. This is primarily achieved through the strategic inclusion of **flaked adjuncts** and other protein-rich malts. 1. **The Role of Flaked Adjuncts:** Flaked oats, flaked wheat, and flaked barley are unsalted grains that undergo a pre-gelatinization process, making their starches readily available for conversion during the mash. These adjuncts are significantly higher in protein content compared to traditional malted grains. This elevated protein contributes to what brewers refer to as “protein haze,” an essential visual characteristic of the NEIPA, and also enhances the beer’s body and creamy mouthfeel. The video suggests a sweet spot of **20-30% of your total grain bill** for these flaked adjuncts, a proportion that strikes a balance between haze/body contribution and fermentable sugar production. Experimenting with different combinations, such as a mix of flaked oats for creaminess and flaked wheat for protein, can fine-tune your desired texture and appearance. 2. **Malted Wheat for Structure and Crispness:** Beyond flaked varieties, malted wheat is another excellent choice for boosting protein levels and contributing to haze. The video highlights that malted wheat can comprise **25-30% of your grain bill**, offering a slightly crisper finish and more fermentable sugars than its flaked counterparts, which can be beneficial for overall beer attenuation. Including malted wheat helps to build a robust protein network, supporting both visual stability and mouthfeel. It’s a versatile ingredient that complements the flaked adjuncts beautifully. 3. **Base Malts and Practical Considerations:** The remainder of your New England IPA grain bill should consist of simple base malts like pale malt or Pilsner malt. Maris Otter, specifically, is a favored option for adding a touch more malt character and a pleasing golden hue, enriching the beer’s overall complexity without overshadowing the hop profile. With higher protein grain bills, especially those exceeding 30% adjuncts, you might encounter a thicker mash, increasing the risk of a “stuck mash.” For brewers using recirculating systems, incorporating **rice hulls** is a crucial preventative measure; these inert husks improve the filter bed, allowing for smoother wort runoff without contributing off-flavors.Mastering Water Chemistry for NEIPA Success
Water chemistry, often underestimated by new brewers, stands as the second pillar in brewing an outstanding New England IPA. Controlling the mineral content, particularly the **chloride to sulfate ratio**, can profoundly impact the perceived bitterness and mouthfeel of your beer. Understanding this balance is not just an advanced technique; it’s fundamental to the NEIPA style. 1. **Chloride vs. Sulfate: The Bitterness Dial:** In IPAs, sulfate minerals tend to accentuate hop bitterness, making it sharper and more pronounced. While this is desirable in West Coast IPAs, the Hazy IPA style calls for a subdued, rounded bitterness. This is where chloride shines. High levels of chloride contribute to a softer, fuller mouthfeel and a perception of juiciness, which perfectly complements the NEIPA’s fruit-forward hop character. Achieving a **2:1 chloride to sulfate ratio** in your brewing water is an excellent rule of thumb, meaning you’ll want twice as much chloride as sulfate to achieve that signature softness. 2. **Starting with a Clean Slate:** The most effective way to achieve precise water chemistry is by beginning with a “blank slate” water source, such as distilled water or reverse osmosis (RO) water. These waters are essentially free of minerals, allowing you to build your water profile from scratch by adding brewing salts. This method eliminates unwanted mineral contributions from your tap water, giving you complete control over the final profile. Common brewing salts include calcium chloride for chloride ions and gypsum (calcium sulfate) for sulfate ions, along with Epsom salt (magnesium sulfate) and baking soda (sodium bicarbonate) for pH adjustments and added mineral complexity. 3. **Beyond the Ratio: A Deeper Dive:** While the 2:1 ratio is a great starting point, a typical NEIPA water profile might target specific mineral concentrations. For instance, calcium levels around 75-100 ppm are beneficial for enzyme activity in the mash and yeast health, while maintaining a healthy protein haze. Magnesium, at 10-20 ppm, is also important for yeast metabolism. When starting with RO water, you will likely add calcium chloride to hit target chloride levels (e.g., 150-200 ppm) and some gypsum to achieve a lower sulfate level (e.g., 75-100 ppm), thereby creating the desired 2:1 ratio and overall mineral balance.The Mash: Optimizing for Sweetness and Body
Once your grain bill and water profile are meticulously prepared, the mash process for your New England IPA is the next crucial step. The specific mash temperature you choose will dictate the fermentability of your wort, directly influencing the final sweetness, body, and alcohol content of your beer. 1. **Targeting the Ideal Mash Temperature:** A mash temperature of approximately **154°F (~68°C)** is highly recommended for NEIPAs. This temperature favors the activity of beta-amylase enzymes, which produce a higher proportion of unfermentable sugars (dextrins). The result is a wort with slightly less fermentable sugars, leading to a finished beer with a pleasant residual sweetness and a fuller, more substantial body. This subtle sweetness provides a perfect canvas for the intense hop aromas and flavors to shine, balancing the overall profile of your Hazy IPA. 2. **Impact of Temperature Variation:** Mashing at slightly lower temperatures (e.g., 148-152°F / 64-67°C) would result in a more fermentable wort, yielding a drier beer with a thinner body. Conversely, mashing at higher temperatures (e.g., 156-158°F / 69-70°C) would produce an even sweeter beer with an even fuller body, which could potentially become cloying if not balanced by sufficient hop character. The 154°F (~68°C) sweet spot provides the ideal balance for a New England IPA. 3. **Mash Duration and pH:** While the video suggests a 45-minute mash, typical mash times for homebrewing range from 60 to 90 minutes to ensure full conversion of starches. For a protein-rich NEIPA mash, ensuring adequate conversion time is important. Additionally, controlling mash pH is critical; aiming for a pH between 5.2 and 5.5 is optimal for enzyme activity, wort clarity (despite the haze, a healthy mash benefits flavor), and hop utilization. Your water chemistry adjustments will play a significant role in achieving this ideal pH.Unleashing the Hops: Bitterness, Aroma, and Flavor
Hops are undeniably the star of any IPA, and for the New England IPA, their role shifts dramatically from simple bitterness to a complex symphony of aroma and flavor. This style prioritizes massive late and post-boil hop additions to capture delicate hop oils, creating a “fruit bomb” experience. 1. **Hop Selection for the “Fruit Bomb”:** The best hops for a Hazy IPA are those bursting with **stone fruit, citrus, and tropical aromas and flavors**. Cultivars like Citra, Mosaic, Galaxy, Nelson Sauvin, El Dorado, and Idaho 7 are incredibly popular choices, each offering unique nuances from grapefruit and passionfruit to peach and guava. Websites like USAhops.org provide valuable hop finder tools that allow you to explore varieties based on their flavor profiles, helping you curate your perfect hop blend. Brewing a Single Malt and Single Hop (SMASH) beer can also be an excellent way to discover individual hop characteristics you love. 2. **Strategic Hop Additions:** * **Bittering Hops:** Unlike traditional IPAs, NEIPAs require a subdued bitterness. Aiming for around **50 IBUs** is a good target, achieved with a minimal amount of a neutral bittering hop like Magnum or Warrior at the start of a shorter, **30-minute boil**. This early addition provides just enough bitterness to balance the sweet wort without imparting harshness. * **Whirlpool Additions:** This is where the magic happens for NEIPAs. Adding a substantial amount of flavor hops *after* the boil, as the wort cools, but *before* chilling completely, is crucial. The video recommends a whirlpool temperature around **175°F (~80°C)** for a **15-minute steep**. This lower temperature extracts delicate hop oils and aromas without excessive bitterness. The narrator suggests **4 oz (~113g)** for a 5-gallon batch as a good starting point, but encourages experimentation. Different hop oils have varying volatilities; a lower whirlpool temperature helps preserve the more delicate aromatic compounds. * **Dry Hopping and Biotransformation:** Dry hopping, the addition of hops during or after fermentation, is another powerful tool. Adding hops during active fermentation (high krausen) can lead to **biotransformation**, where yeast enzymes interact with hop compounds to create new, often more intense and complex aroma compounds, also contributing to haze stability. However, the video rightly warns about the risks of oxidation with dry hopping, especially after fermentation has completed. While dry hopping can enhance “bright and prominent hop character,” it’s “not always necessary” as significant character can be achieved via whirlpool additions. For advanced insights into hop oils and biotransformation, resources from experts like Scott Janish are invaluable. 3. **Avoiding Hop Burn:** While generously hopping your New England IPA is the goal, there is a point of diminishing returns, sometimes resulting in “hop burn” – a harsh, throat-scratching sensation. This can be caused by excessive hop particulate matter, certain hop varieties, or pH issues. To minimize hop burn, ensure hops are fully hydrated, consider reducing very late dry hop additions, and ensure proper fermentation and conditioning.Yeast: The Unsung Hero of Haze and Flavor
While hops often steal the spotlight, your yeast choice plays a crucial supporting role in defining the character of your New England IPA. Beyond just fermenting sugars, the right yeast strain contributes to the NEIPA’s signature haze and unique flavor profile. 1. **Low Flocculation is Key:** The most critical characteristic for a NEIPA yeast strain is its **low flocculation rate**. Flocculation refers to how readily yeast cells clump together and settle out of suspension. A highly flocculating yeast will clear your beer, which is precisely what you want to avoid in a Hazy IPA. Low flocculating strains remain suspended longer, contributing significantly to the beer’s persistent turbidity and mouthfeel. Many yeast manufacturers now offer specific “hazy IPA strains” (e.g., White Labs WLP067 Coastal Hazy Yeast mentioned in the recipe, WLP007 Dry English Ale, WLP066 London Fog, Omega OYL-052 Vermont Ale, Imperial A38 Juice) that are specifically selected for their low flocculation and ability to enhance fruity esters. 2. **Ester Production and Flavor Contribution:** Many popular NEIPA yeast strains are also known for their significant ester production. Esters are chemical compounds produced by yeast during fermentation that contribute fruity aromas and flavors (e.g., pear, apple, banana, tropical fruit). These yeast-derived esters beautifully complement the hop-derived tropical notes, creating a complex and harmonious fruit profile. Fermenting at the warmer end of the yeast’s recommended temperature range can often enhance ester production, adding another layer of complexity. 3. **Kveik: A Versatile Alternative:** For brewers without precise temperature control, **Kveik** yeast strains offer an excellent alternative. These Norwegian farmhouse yeasts are known for their ability to ferment cleanly at incredibly high temperatures (80-100°F / 27-38°C) without producing off-flavors, while still contributing a unique fruity ester profile and often exhibiting low flocculation, making them suitable for Hazies. Their rapid fermentation times can also get your beer into the keg faster.The NEIPA Killer: Combating Oxidation
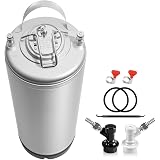
All the meticulous planning and precise brewing techniques can be undone in an instant by oxygen exposure. For New England IPAs, **oxidation is public enemy number one** once fermentation is complete, having devastating effects on both appearance and flavor. Preventing oxidation is perhaps the single most critical factor for a truly exceptional Hazy IPA. 1. **Understanding Oxidation’s Damage:** Oxygen reacting with hop compounds and other beer components leads to a rapid degradation of flavor and aroma. Oxidized Hazies often exhibit a stale, “wet cardboard” or sherry-like flavor, and their vibrant hop character quickly diminishes, sometimes shifting to notes of caramel or even onion/garlic. Visually, a beautiful golden haze can transform into an unappealing murky brown or purple. This is why minimizing oxygen contact post-fermentation is non-negotiable. 2. **Avoiding Cold Crashing and Suck-Back:** One common brewing practice that poses a significant oxidation risk for NEIPAs is cold crashing. Cooling beer in a fermenter creates negative pressure, which can cause the fermenter to “suck back” whatever is in the airlock (sanitizer, air, etc.) directly into your beer. This introduces a substantial amount of oxygen. Therefore, **never cold crash a Hazy IPA** if you intend to preserve its freshness and character. Allow the beer to condition at fermentation temperature before transferring. 3. **The Indispensable Closed Transfer:** The most effective way to prevent oxidation during transfer is a **closed transfer** from fermenter to keg. This method ensures that the beer never touches ambient air. * **Purging the Keg:** Firstly, your keg must be completely purged of oxygen. This can be done by filling it completely with a diluted sanitizer solution and then pushing it out with CO2, or by repeatedly filling the keg with CO2 to pressure (e.g., 30 PSI), shaking it, and then releasing the pressure, doing this 5-10 times. This process, known as “purging,” displaces all oxygen with inert CO2. * **Connecting for Transfer:** Connect a liquid line from your fermenter’s spigot to the “liquid in” post of your purged keg. The video recommends carefully transferring the beer down the keg’s dip tube for minimal disturbance and splashing, further reducing oxygen pickup. * **CO2 on the Fermenter:** Crucially, apply a low amount of CO2 (e.g., **1 PSI**) to the headspace of your fermenter. This creates positive pressure, ensuring that as beer exits, CO2 enters, preventing atmospheric oxygen from being sucked into the fermenter through bungs or airlocks. Carbonation caps or specialized fermenter lids with gas posts are excellent tools for this. Even non-pressurized fermenters like plastic buckets can handle 1 PSI, as the bung will typically vent before any damage occurs. * **Completing the Transfer:** With the keg’s pressure relief valve (PRV) slightly open to allow CO2 to escape, open your fermenter’s spigot and turn on the CO2 to the fermenter. The beer will flow into the keg, displaced by CO2. Once transferred, seal the keg, apply serving pressure, and pull the PRV a few times to ensure any residual oxygen is purged. 4. **Dry Hopping in an Oxygen-Free Zone:** If you choose to dry hop, doing so during high krausen (active fermentation) is safer, as the actively fermenting yeast will consume much of the introduced oxygen. However, for maximum safety, some advanced homebrewers perform “keg dry hopping” by adding hops directly into a purged keg before performing a closed transfer of the fermented beer onto them. This minimizes oxygen exposure for the hops themselves.Advanced Considerations for NEIPA Longevity
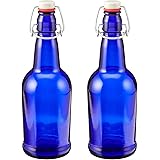
Even with meticulous brewing and oxygen-preventative transfers, there are further steps you can take to ensure your New England IPA remains fresh and vibrant for as long as possible. 1. **No Clarifying Agents:** It should go without saying, but avoid any clarifying agents like Irish moss, whirlfloc, or gelatin. These are designed to drop out haze-forming proteins, which is directly contrary to the NEIPA style. Your goal is to work *with* the beer’s natural haze, not against it. 2. **Preservatives and Antioxidants:** To further extend the shelf life and combat any minute oxygen ingress, consider adding **preservatives** to the keg. **Potassium metabisulfite** (often found in Camden tablets) or **ascorbic acid** (Vitamin C) act as antioxidants, effectively “scrubbing” any residual oxygen that might be present in the keg headspace or dissolved in the beer. A small dose of either, added to the purged keg before transfer, can do wonders for maintaining freshness, though it’s important to remember that Hazies are truly best when fresh. 3. **Bottling Hazy IPAs: A Risky Endeavor:** While kegging is by far the superior method for preserving a New England IPA, bottling *can* be done, albeit with significantly higher risk of oxidation. * **Minimize Air Exposure:** If bottling, avoid using a bottling bucket, which introduces unnecessary oxygen. Instead, pre-portion your priming sugar into each bottle. * **Utilize a Bottling Wand:** Connect a bottling wand directly to your fermenter’s spigot. This allows you to fill bottles from the bottom up, minimizing splashing and oxygen pick-up. The wand’s automatic shut-off mechanism between bottles helps prevent uncontrolled air exposure. * **Purge Bottles if Possible:** If you have access to CO2, even a quick purge of each bottle with CO2 before filling can reduce the initial oxygen load. While the secondary fermentation from priming sugar will consume some oxygen, reducing the initial amount is always beneficial. * **Consume Quickly:** Bottled New England IPAs have a much shorter shelf life than kegged versions. Plan to consume them as soon as carbonated for the best experience.A Sample New England IPA Recipe
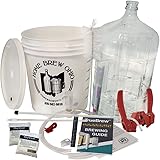
For those eager to dive in, here’s a concrete example, building on the video’s suggestions, to guide your first (or next) ultimate Hazy IPA brew: * **Water Profile (for 7 gallons distilled/RO water):** * Adjust for a **2:1 chloride to sulfate ratio**. For example: * Calcium Chloride: 8-10g * Gypsum: 3-4g * Epsom Salt: 2-3g * Baking Soda: 1-2g * *(Note: Use a brewing water calculator to hit precise target ppm levels, aiming for 150-200 ppm Chloride, 75-100 ppm Sulfate, 75-100 ppm Calcium)* * **Grain Bill:** * 40% Maris Otter * 30% Pilsner Malt * 20% Malted Wheat * 10% Flaked Oats * *(For a 5-gallon batch, this might look like 8 lbs Maris Otter, 6 lbs Pilsner, 4 lbs Malted Wheat, 2 lbs Flaked Oats – adjust total for desired gravity)* * **Mash:** * Mash at **154°F (~68°C)** for **45-60 minutes**. * Consider adding **rice hulls** if your system struggles with thick mashes. * **Boil (30 minutes):** * **Bittering Hop (start of boil):** 1 ounce Warrior (for approximately 47 IBUs) * *(Note: Warrior is a clean bittering hop. Magnum is another excellent choice.)* * **Whirlpool (chill to 175°F / ~80°C, steep for 15 minutes):** * 2 ounces Motueka * 2 ounces Simcoe * *(Feel free to substitute with your favorite tropical/citrus hops like Citra, Mosaic, Galaxy, El Dorado.)* * **Fermentation:** * Chill wort to **68°F (20°C)**. * Target Original Gravity (OG): Approximately **1.065**. * Pitch White Labs WLP067 Coastal Hazy Yeast (or other low flocculating hazy strains like Omega OYL-052 Vermont Ale, Imperial A38 Juice). * Ferment for one week. * **Packaging:** * Perform a **closed transfer** into a thoroughly purged keg. * Consider adding a small dose of potassium metabisulfite or ascorbic acid to the keg for oxidation protection. * Carbonate to your desired level and serve as soon as it’s at pressure. Brewing the ultimate New England IPA is a journey of refinement, blending art and science to capture a fleeting moment of tropical hop paradise. While it may seem daunting with its specific requirements, the reward of a perfectly crafted Hazy IPA is immensely satisfying. By focusing on grain selection for body and haze, dialing in your water chemistry, executing precise hop additions, choosing the right yeast, and meticulously guarding against oxygen, you will undoubtedly be well-equipped to create your own outstanding version of this beloved style. Happy brewing, and cheers to your next hero Hazy IPA!Brewing Up Answers: Your Hazy IPA Q&A
What is a New England IPA (NEIPA)?
A New England IPA, also known as a Hazy IPA, is a beer style famous for its hazy appearance, soft mouthfeel, low bitterness, and intense tropical fruit aromas. Brewers aim for a juicy, opaque glow and a fruit-forward hop character in this style.
Why is the grain bill important for brewing a NEIPA?
The grain bill is crucial for achieving the NEIPA’s signature hazy look and a full, creamy mouthfeel. This is done by including flaked adjuncts like oats and wheat, which are high in protein and contribute to the beer’s haze.
How does water chemistry affect a NEIPA’s taste and feel?
Water chemistry significantly impacts a NEIPA’s perceived bitterness and mouthfeel, especially the balance between chloride and sulfate minerals. A higher chloride to sulfate ratio (like 2:1) helps create a softer, juicier mouthfeel, which is characteristic of the style.
What kind of hops should I use for a New England IPA?
For a NEIPA, you should choose hops that are bursting with stone fruit, citrus, and tropical aromas and flavors, such as Citra, Mosaic, or Galaxy. These hops are primarily added late in the brewing process or after boiling to maximize their delicate oils and prevent harsh bitterness.
Why is it important to prevent oxygen exposure when brewing a NEIPA?
Preventing oxygen exposure after fermentation is critical for NEIPAs because oxygen rapidly destroys their fresh hop flavors and aromas, leading to stale tastes and an unappealing murky brown color. Techniques like performing a ‘closed transfer’ into a thoroughly purged keg are essential to protect the beer’s quality.